
How to Shingle a Roof
How to shingle a roof is one of the most searched roofing questions online. Many homeowners look for this topic because shingles are common, familiar, and widely used across the United States. However, while shingle roofs look simple from the ground, the installation process is detailed, technical, and easy to get wrong.
In our experience, most shingle roof problems do not come from the shingles themselves. Instead, they come from poor installation choices, skipped steps, or incorrect fastening patterns. Because of that, understanding how shingling works helps homeowners make better decisions, even if they never plan to install shingles themselves.
This article explains how roof shingling works, what steps matter most, and why proper installation makes such a big difference, especially in Florida. Before we begin, here is a quick note: this article is for general education only. We do not recommend shingling a roof by yourself, because roofing work can be dangerous and small mistakes can cause leaks or wind damage. Instead, we recommend that you use this information to understand the process and then work with qualified professionals who can follow Florida code and manufacturer requirements.
Shingling a roof involves preparing the roof deck, installing underlayment, placing starter shingles, laying asphalt shingles in proper courses, fastening them correctly, sealing penetrations, and finishing with ridge caps. Proper alignment, ventilation, and fastening are essential to prevent leaks and wind damage.
What Roof Shingling Actually Means
Before diving into steps, it helps to clarify what “shingling a roof” really involves.
Roof shingling means installing overlapping asphalt shingles in a specific pattern so water flows down and off the roof. Each layer protects the one below it, and together they form a complete roofing system.
Because shingles rely on overlap and gravity, small mistakes can create big problems. Therefore, installers must follow the correct sequence from start to finish.
Types of Asphalt Shingles Commonly Used
Not all shingles install the same way. Understanding the type helps explain why details matter.
Three-Tab Shingles
These are flat, uniform shingles with a simple design.
-
Lighter weight
-
Lower cost
-
Shorter lifespan
They require precise alignment because any error becomes very visible.
Architectural (Dimensional) Shingles
These are thicker and layered for depth.
-
Heavier and more durable
-
Better wind resistance
-
More forgiving visually
In Florida, architectural shingles are more common because they handle wind better.
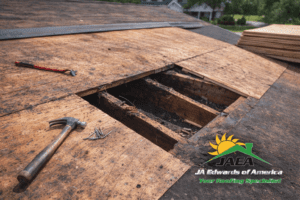
Step 1: Inspect and Prepare the Roof Deck
Every shingle job starts with the deck. Nothing works correctly if the deck is not solid.
What Installers Check First
-
Soft or rotted wood
-
Loose decking panels
-
Uneven surfaces
-
Proper attachment to rafters or trusses
In our experience, skipping deck repairs leads to early shingle failure. Shingles bend and crack when the surface underneath moves.
Therefore, deck preparation is not optional.
Step 2: Install Drip Edge Correctly
Drip edge protects the roof edges from water damage.
Why Drip Edge Matters
-
Directs water into gutters
-
Protects fascia and decking
-
Prevents water from wicking under shingles
Drip edge goes on before underlayment at the eaves and over underlayment at the rakes. This sequence matters because water always follows the easiest path.
Step 3: Install Underlayment and Ice Protection
Underlayment adds a secondary water barrier beneath the shingles.
Common Underlayment Types
-
Synthetic roofing underlayment
-
Ice and water shield (especially at eaves, valleys, and penetrations)
In Florida, high-temperature underlayment performs better under strong sun exposure.
According to the Florida Building Code, underlayment selection and placement play a key role in roof performance.
Step 4: Layout and Starter Shingles
Before the first full shingle goes on, layout matters.
Chalk Lines and Alignment
Installers snap chalk lines to keep courses straight. Without guide lines, shingles drift, and that drift becomes obvious from the ground.
Starter Shingles
Starter shingles go along the eaves.
They:
-
Seal the first row
-
Prevent wind uplift
-
Protect against water intrusion
We often see roof issues when installers skip proper starters or install them backward.
Step 5: Installing the First Courses of Shingles
Once starters are in place, the first courses set the pattern.
Key Rules
-
Start at the bottom and work upward
-
Follow manufacturer offset patterns
-
Keep nail placement exact
Each shingle must overlap the one below it correctly. Otherwise, water can travel sideways or upward during wind-driven rain.
Step 6: Proper Nailing Matters More Than People Think
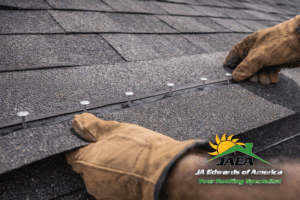
Nailing mistakes cause many shingle failures.
Correct Nailing Includes
-
Using the right nail type
-
Placing nails in the correct zone
-
Using the correct number of nails per shingle
In Florida, wind zones often require additional fasteners. Therefore, installers must follow local code and manufacturer instructions.
Step 7: Valleys and Roof Penetrations
Valleys and penetrations require extra attention.
Common Valley Methods
-
Open metal valleys
-
Closed-cut shingle valleys
Each method has specific rules. Cutting corners in valleys almost always leads to leaks.
Step 8: Ridge Caps and Final Details
Ridge caps finish the roof and help with ventilation when ridge vents are used.
They must:
-
Overlap correctly
-
Be secured against wind
-
Align with vent systems
A roof may look finished before ridge caps go on, but it is not complete without them.
Why Shingling Is Especially Critical in Florida
Florida adds extra stress to shingle roofs.
Because of:
-
High winds
-
Heavy rain
-
Strong UV exposure
Installers must follow higher standards. We often see roofs fail early when installers use methods that might work in calmer climates but not here.
Should Homeowners Shingle a Roof Themselves?
Shingling looks straightforward, but it is physically demanding and technically precise.
In our experience, DIY shingle jobs often fail because:
-
Nails are misplaced
-
Flashing details are skipped
-
Ventilation is ignored
Understanding the process helps homeowners ask better questions. However, professional installation usually delivers better long-term results.
If you want help evaluating your roof before installation, start here:
roof inspection services
Common Shingle Installation Mistakes We See
In our experience, shingle roofs rarely fail because of bad shingles. Instead, they fail because of repeated installation mistakes.
The most common problems
-
Nails placed too high or too low
-
Too few nails per shingle
-
Missing or incorrect starter shingles
-
Poor flashing around penetrations
-
Weak valley construction
Each of these issues alone can shorten roof life. However, when several happen together, failure accelerates quickly.
Why Nail Placement Is Critical
Nails hold shingles in place against gravity and wind. Therefore, nail placement must be exact.
What happens when nails are wrong
-
Shingles lift during storms
-
Sealant strips do not activate properly
-
Wind-driven rain enters under shingles
In Florida, this matters even more because wind uplift pressure is stronger.
That is why manufacturers clearly define nail zones, and installers must follow them.
Florida Wind Ratings and Shingle Requirements

Florida does not treat shingle roofs lightly.
Because of hurricane exposure, the state requires specific wind performance standards.
What Florida Requires
Most approved shingles in Florida must meet standards like:
-
ASTM D3161
-
ASTM D7158
These standards test how shingles perform under simulated wind conditions.
The Florida Building Code references these requirements as part of product approval and installation rules.
Therefore, using the right shingle and installing it correctly both matter.
Why Manufacturer Instructions Matter
Every shingle brand publishes installation instructions. Those instructions are not suggestions.
They define:
-
Nail count
-
Nail placement
-
Underlayment requirements
-
Ventilation rules
If installers ignore these rules, warranties may not apply.
In our experience, warranty issues usually trace back to installation shortcuts, not product defects.
How Long It Takes to Shingle a Roof
Homeowners often ask how long shingle installation takes.
The answer depends on several factors.
Key timeline factors
-
Roof size
-
Roof complexity
-
Tear-off vs overlay
-
Weather conditions
Typical timeline
-
Small homes: 1–2 days
-
Medium homes: 2–3 days
-
Large or complex roofs: longer
While shingling moves faster than some other systems, rushing the job often creates problems later.
Cost Factors That Affect Shingle Installation
Shingle roofing costs vary more than people expect.
What influences cost most
-
Shingle type and rating
-
Deck repairs
-
Underlayment quality
-
Flashing and ventilation upgrades
-
Labor complexity
In our experience, homeowners save more money long-term by focusing on correct installation instead of choosing the cheapest material.
Maintenance After a Shingle Roof Is Installed
Shingle roofs do not require constant attention, but they do need basic care.
What we recommend
-
Annual visual inspections
-
Clearing debris from valleys and gutters
-
Checking flashing after storms
-
Watching for lifted or missing shingles
Early detection prevents small issues from becoming expensive repairs.
Why Professional Installation Makes a Difference
Shingle roofing looks simple from the ground. However, the details happen where homeowners rarely look.
Professional installers understand:
-
Local code requirements
-
Wind exposure zones
-
Proper fastening patterns
-
Correct sequencing
In our experience, professionally installed shingle roofs last longer and perform better in Florida conditions.
If you want help evaluating your roof or planning a replacement, start here:
roof replacement services
Final Takeaway
Shingling a roof is not just about placing shingles in rows. It is about building a system that manages water, resists wind, and protects the home for years.
When homeowners understand how shingle installation works, they make better choices. As a result, they avoid common mistakes and get better long-term performance from their roof.