How to Cut Metal Roofing
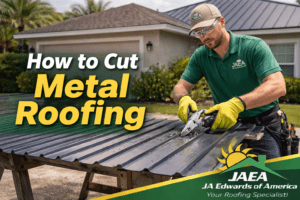
If you ever held a piece of metal roofing, you already know the truth: it looks simple until you try to cut it. Then it turns into sharp edges, scratched paint, weird jagged cuts, and a pile of metal crumbs that want to live in your shoes forever.
At JA Edwards of America Roofing, we work on roofs across Florida, so we see metal roofing mistakes all the time. People rush the cut, use the wrong tool, and then wonder why the panel looks bad or why the edges start rusting later. However, cutting metal roofing can be clean and simple if you follow a few basic rules.
Right after you finish reading this, you should feel confident about:
-
which tool to use (and when)
-
how to mark and support the panel
-
how to avoid scratches and rust
-
what mistakes cause leaks later
If you want a pro to check your roof setup before you start cutting or installing, schedule a free inspection with us: roof inspection
IMPORTANT: We’re sharing this guide to help homeowners understand how steel roofing is installed, so you can ask better questions and spot shortcuts. However, we do not recommend installing steel roofing by yourself. Roof work is dangerous, and steel systems require precise flashing, fastening, and safety setup. A small mistake can lead to leaks, voided warranties, or serious injury. If you’re planning a metal roof, the safest move is to have a qualified roofing contractor handle the installation and schedule a professional inspection first.
Quick definition: what “metal roofing” means here
When people say “metal roofing,” they usually mean metal panels like:
-
standing seam panels
-
ribbed / exposed fastener panels
-
metal shingles (less common, but still metal)
These panels often have a painted coating (to protect the metal and help it last). Because of that coating, you can’t treat metal like a random piece of scrap. If you destroy the finish, you can create future rust problems. As a result, the “best cut” is not only straight. It also protects the coating.
Why clean cuts matter (more than people think)

A bad cut is not just ugly. In real life, it can cause problems like:
-
rough edges that slice underlayment or hands
-
gaps where water can sneak in
-
exposed raw metal that can rust
-
bent panels that never sit flat again
-
extra vibration noise in wind because the panel edge is uneven
In Florida, this matters even more because we deal with:
-
heavy rain
-
salty air in some areas
-
storms and high wind
So yes, your cut quality can affect how long the roof lasts.
The 3 golden rules before you cut metal roofing
1) Pick the tool based on the cut
Different tools shine in different situations. For example, tin snips feel slow, but they’re great for small, careful trimming. On the other hand, electric shears make long cuts faster with a clean edge.
2) Support the panel
Metal panels can flex and shake. If you cut while the panel hangs in the air, the cut line can “walk” away from you. Then you get a wavy mess.
3) Protect the paint finish
Scratches are not just cosmetic. Scratches can become rust spots later, especially near edges and fasteners.
Tools you can use to cut metal roofing (and when each one makes sense)
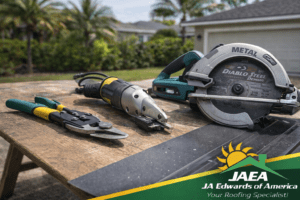
Tin snips (hand snips)
Best for: small trims, notches, small corrections
Pros: cheap, controlled, no electricity needed
Cons: slow, can bend the metal, tiring for long cuts
Tin snips come in left-cut, right-cut, and straight-cut. If you use the wrong one, the metal can curl in a frustrating way. Therefore, pick the snip that matches your cut direction.
JA Edwards real-world note: We often see homeowners try to cut an entire long panel with hand snips. It can work, but it usually creates a wavy edge and a bent panel.
Electric shears (power shears)
Best for: longer cuts, cleaner edges, faster work
Pros: smooth cut, less panel bending, faster
Cons: costs more, needs power, creates metal “chips” you must clean up
Electric shears are one of the best choices for metal roofing panels, especially ribbed panels and long straight cuts. However, they can leave behind tiny metal pieces. If you leave those pieces on the roof, they can rust and stain the panels.
Nibbler tool
Best for: tight curves, detailed cuts
Pros: great control, good for odd shapes
Cons: creates lots of tiny chips, slower than shears
A nibbler “bites” through metal with little punches. It’s useful, but it creates a mess of little metal bits, so cleanup matters.
Circular saw with a metal-cutting blade
Best for: long straight cuts (when done right)
Pros: fast, straight, good for stacks (carefully)
Cons: can throw hot metal, can damage coating, loud, more risk
This is where things get controversial, because some people cut metal roofing with a standard circular saw and call it a day. It can work, but you must use the right blade and technique.
In addition, you have to think about heat and sparks. Too much heat can damage paint at the cut edge. As a result, you can shorten the life of that edge.
If you go this route:
-
use a blade made for cutting metal
-
cut with steady speed
-
support the panel fully
-
clean the surface after cutting
Angle grinder (what NOT to do most of the time)
Best for: rare cases, small adjustments on some components
Usually NOT best for: cutting painted roofing panels
Grinders can create a lot of heat and sparks. They can burn the coating and leave rough edges. Because of that, many manufacturers and pros avoid grinders on painted panels unless there’s a specific reason.
Step 1: Measure and mark your cut line the right way
The cut line is your roadmap. If it’s wrong, everything is wrong.
Here’s a simple marking method:
-
measure twice
-
mark with a pencil or marker that you can see
-
use a straight edge (a level works fine)
-
mark on the side where your tool will follow the line
Pro tip: If you worry about scratching, you can put painter’s tape on the cut line and mark on the tape. It also helps protect the finish while you work.
Step 2: Set up a safe cutting area
Cutting metal on the roof is possible, but it’s not always smart. It depends on the situation.
A safer setup usually looks like this:
-
cut on the ground when possible
-
use sawhorses or a stable table
-
keep the panel supported near the cut line
-
keep your feet and hands away from the cutting path
Florida roofs can get slippery and hot, so roof cutting adds risk. Therefore, if you can cut on the ground, do it.
Step 3: Cut metal roofing without ruining the panel
No matter which tool you use, the basics stay the same:
-
start slow and stay on the line
-
don’t force the tool
-
keep the panel stable
-
keep the blade or shear straight
If you force it, you can:
-
bend the panel
-
create jagged edges
-
scratch the finish
-
drift off the cut line
Clean-up matters (yes, really)
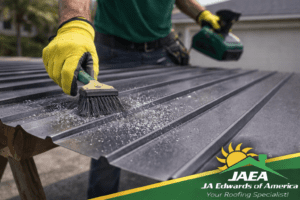
After you cut, remove:
-
metal shavings
-
chips
-
dust
Those tiny metal bits can rust quickly and stain the roof. In addition, they can get stuck in shoes and scratch panels when someone walks later.
Protecting cut edges so they last longer
When you cut a panel, you expose an edge. Even with coated metal, that edge can become a weak spot over time.
Here’s what we typically recommend in real life (depending on the panel type and manufacturer guidance):
-
handle cut edges carefully so you don’t chip the coating
-
avoid dragging panels across each other
-
keep edges clean and dry
-
use correct trims and flashing details so water does not sit on raw edges
Water sitting on edges is bad anywhere. In Florida, it’s worse because rain comes hard and often.
Cutting around penetrations (vents, pipes, skylights)
These cuts matter because they sit around places where water loves to sneak in.
For these areas:
-
measure carefully
-
use a template if needed
-
cut smaller first, then enlarge slowly
-
keep the cut smooth so flashing sits tight
If flashing does not sit tight, water can move under it. As a result, leaks show up later and people blame “metal roofs” when the real issue was the detail work.
Common mistakes we see in Florida (and how to avoid them)
Mistake 1: Cutting with a grinder and burning the finish
This one is classic. The cut looks “done,” but the paint is damaged near the edge. Later, rust shows up.
Better: use snips, electric shears, or the correct metal-cutting blade with control.
Mistake 2: Not supporting the panel
The panel bends during the cut. Then it never lays flat.
Better: support near the cut line. Use sawhorses.
Mistake 3: Leaving metal chips on the roof
The chips rust and stain the panels. The roof looks “dirty” even though it’s new.
Better: clean as you go.
Mistake 4: Measuring from the wrong reference point
Metal panels have ribs, overlaps, and coverage widths. People measure wrong, then the panel doesn’t align.
Better: confirm where the panel actually starts and ends once installed.
Mistake 5: Cutting too much, too soon
You cut a big opening fast, then realize it’s off by half an inch. Now the flashing won’t cover it.
Better: cut smaller first, then sneak up on the final size.
Maintenance after cutting and installing
Metal roofs can last a long time, but Florida is tough on everything. To keep the roof looking good:
-
check sealants around penetrations over time
-
keep gutters clean so water drains correctly
-
remove debris that holds moisture
-
watch for scratches after service work (like solar work or HVAC)
Because service people walk on roofs, scratches can happen. Catching them early helps.
Real cost: what it actually costs to cut metal roofing
The cost to cut metal roofing depends on your tool choice:
-
tin snips: low cost, but high effort and time
-
electric shears / nibbler: medium cost, faster and cleaner
-
saw + metal blade: medium cost, fast but needs skill and care
-
pro help: higher cost, but less waste and fewer mistakes
What most people forget is the hidden cost: wasted panels. One wrong cut on an expensive panel hurts. Therefore, spending on the right tool can save money.
Efficiency and energy in Florida (why cutting connects to performance)
You might wonder how cutting affects energy. Here’s the simple answer:
If poor cutting leads to:
-
gaps
-
bad overlaps
-
weak flashing details
…then heat and moisture control can suffer. A well-installed roof system helps your home stay stable and dry. In addition, roof color and reflectivity can affect attic heat.
For general background, the Department of Energy explains roof reflectivity and “cool roof” ideas here: U.S. Department of Energy, cool roofs info
JA Edwards experience: what we’ve learned the hard way
From our experience working on roofs in Florida, metal roofing rewards patience. People think the magic is the panel. However, the real magic is the details:
-
straight cuts
-
clean edges
-
correct flashing
-
correct fasteners
-
correct layout
We often see metal roofs fail early because someone rushed the prep and the cuts. On the other hand, when the cuts are clean and the details are tight, metal can perform extremely well.
Conclusion
Cutting metal roofing is not complicated. It’s just unforgiving. Use the right tool, support the panel, protect the finish, and clean up every time. If you do that, you get clean edges, better fit, and fewer future problems.
If you want a professional set of eyes before you cut or install anything, schedule a free inspection with JA Edwards: roof inspection