
How to Install Steel Roofing
Install Steel roofing can be a great option for Florida homes. It can last a long time, handle storms better than many materials, and help with heat when you choose the right system.
However, steel roofing only performs well when the installation is done right.
From our experience working on roofs across Florida, most “metal roof problems” come from bad details, not bad metal. For example, we often see leaks caused by rushed flashing work, wrong fasteners, or poor underlayment choices.
In this guide, we explain how steel roofing gets installed in a clear, simple way. You will understand the parts, the order, and the common mistakes. That way, you can make smarter decisions, even if you hire a contractor to do the job.
Important safety note: Roof work is dangerous. Falls happen fast. We share this guide to help homeowners understand the process, not to push anyone onto a roof without proper training and safety gear.
Steel roofing installation usually follows this order: measure and plan the layout, remove old roofing if needed, repair the deck, install underlayment, add drip edge and flashing, install panels with the correct fasteners, seal penetrations, and finish ridges and edges. In Florida, wind resistance, waterproof flashing, and clean fastener work matter the most.
Why Steel Roofing Installation Matters So Much in Florida
Florida roofs deal with:
-
strong sun and heat
-
heavy rain and humidity
-
sudden storms and wind events
-
salt air in coastal areas
Because of this, small mistakes grow into big problems.
For example, a tiny gap in flashing can turn into a leak during a sideways storm. A cheap screw can back out over time. Also, metal expands and contracts with heat, so the system needs room to move without breaking seals.
In our experience, the best steel roofs in Florida share the same traits:
-
clean, consistent panel layout
-
correct underlayment and waterproofing
-
proper flashing around every weak point
-
correct fasteners installed the right way
-
attention to ventilation and drainage
What “Steel Roofing” Usually Means
“Steel roofing” is not one single thing. Most residential steel roofing systems fall into these categories:
Standing seam steel roofing
This system uses long panels with raised seams. Hidden clips or concealed fasteners hold the panels down. Many homeowners like standing seam because it looks clean and handles water well.
Exposed-fastener steel panels
This system uses panels that overlap and get screwed down through the face of the panel. It costs less, but it needs careful fastener work and maintenance.
Steel shingles
These look more like regular shingles. They still need correct underlayment and flashing, because the roof system matters more than the look.
If you want a quick comparison of steel and other metal systems, the Metal Roofing Alliance overview is helpful.
The Tools and Materials That Matter Most
You can install steel roofing with different tool setups, but some items always matter.
Common tools
-
tape measure, chalk line, square
-
drill/driver with correct bit
-
snips and electric shears
-
circular saw with the right blade (used carefully)
-
metal file or deburring tool
-
hand seamer (for small bends)
If you want more information about you can check: how to cut metal roofing.
Key materials
-
underlayment (high-temp or synthetic, depending on system)
-
ice-and-water style membrane (often used in valleys and around penetrations, even in Florida)
-
drip edge
-
panel system (standing seam or exposed fastener)
-
correct screws or clips
-
closure strips (foam closures for exposed-fastener systems)
-
sealant that matches the manufacturer’s rules
-
flashing kit and trim pieces
Also, flashing details matter a lot. If you want a simple breakdown of flashing basics, connect to your existing post: roof flashing.
Step 1: Start With the Right Roof Plan
Before anyone installs steel panels, they should answer these questions:
-
Where do water and wind hit hardest?
-
Where are all penetrations (vents, pipes, skylights)?
-
Does the attic have proper ventilation?
-
Are we installing over shingles or removing the old roof?
Florida-specific note
In Florida, wind-driven rain finds weak points quickly. Because of that, planning should focus on:
-
panel direction and overlap logic
-
valley waterproofing
-
edge metal and drip edges
-
correct fastening pattern
When the layout looks random, the roof usually performs poorly. Clean layout often signals careful work.
Step 2: Decide Whether You Remove the Old Roof
Homeowners often ask: “Can we install steel roofing over shingles?”
Sometimes, yes. Sometimes, no.
This depends on:
-
roof deck condition
-
existing layers (too many layers becomes a problem)
-
local rules and manufacturer requirements
-
how flat the surface is
-
how you will handle flashing and edges
Removing the old roof gives you a cleaner base and lets you see hidden deck damage. On the other hand, overlay can save time in certain cases if the roof is in good shape and the system allows it.
Step 3: Inspect and Repair the Roof Deck
Steel roofing is only as strong as what sits under it.
During prep, we look for:
-
soft spots or rot
-
loose decking
-
old nails and sharp debris
-
mold or moisture signs
-
bad edge support
If the deck flexes, fasteners loosen sooner. If the deck is damaged, leaks can show up later even with perfect panels.
Step 4: Use the Right Underlayment (This Is Not Optional)
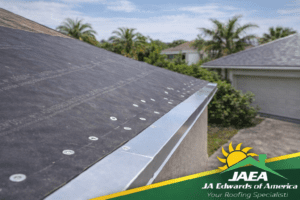
Underlayment is your backup waterproof layer. In Florida, it matters a lot because storms push water in strange ways.
Common underlayment types include:
Synthetic underlayment
This is popular for many systems. It is lighter than felt and more tear-resistant.
High-temp underlayment
This often matters under metal systems because metal can get hot. Some systems require high-temp underlayment by the manufacturer.
Peel-and-stick membrane (used in key areas)
Many crews use peel-and-stick in valleys and around penetrations. It adds protection in the most leak-prone zones.
From our experience, the wrong underlayment is one of the most expensive “cheap choices” on a steel roof.
For a good homeowner-friendly resource about cool roofs and heat, the U.S. Department of Energy has a simple overview.
Step 5: Install Drip Edge and Starter Details
Drip edge helps move water away from the roof edges and protects wood edges.
Also, starter details set the tone for the entire install. If the first line is crooked, the whole roof looks off.
A clean steel roof has:
-
straight starter line
-
correct edge metal placement
-
proper overlap logic
-
sealed transitions where needed
From our experience, edge details separate “looks fine from the street” from “holds up in Florida storms.”
Step 6: Lay Out the Panels Before You Screw Anything Down
Before fastening panels, the installer should:
-
snap chalk lines
-
confirm squareness
-
confirm panel coverage
-
plan how seams land near valleys and penetrations
This prevents “last panel panic,” where someone tries to force a panel fit and creates a gap.
From our experience, rushed layout leads to:
-
uneven overhangs
-
crooked seams
-
bad ridge alignment
-
awkward cuts around vents
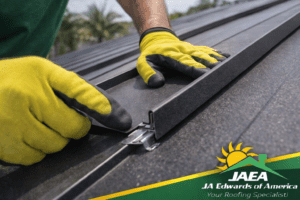
Step 7: Install Steel Roofing Panels the Right Way (Standing Seam vs Exposed Fastener)
Steel roofing install details change based on the system.
Standing seam basics
-
panels lock together at seams
-
clips or concealed fasteners hold panels
-
seams manage water flow
-
thermal movement must be respected
Standing seam often costs more, because the labor is more precise. However, the clean look and water handling can be worth it.
Exposed-fastener basics
-
screws go through the face of the panel
-
washer seats must be correct
-
overlaps must be aligned
-
closure strips are often needed at transitions
Exposed-fastener systems can perform well, but they punish sloppy screw work.
From our experience, most exposed-fastener roof leaks come from:
-
overdriven screws (washer crushed)
-
underdriven screws (washer not sealed)
-
wrong screw type
-
screws placed in the wrong location
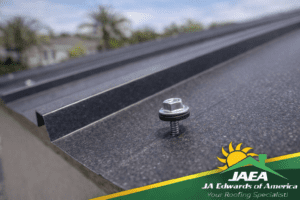
Step 8: Fasteners and Washers: Tiny Parts, Big Results
Fasteners matter more than most homeowners realize.
Good fastener work means:
-
using manufacturer-approved screws or clips
-
installing screws straight (not angled)
-
not over-tightening
-
placing screws in the correct zone
-
checking spacing patterns
In addition, coastal Florida can accelerate corrosion. That’s why material choice, coating quality, and correct fasteners all matter.
Step 9: Flashing Is the Real “Roof Test” for Install Steel Roofing
Flashing protects transitions and penetrations. This is where water tries to enter first.
Critical flashing zones:
-
valleys
-
chimneys
-
wall-to-roof transitions
-
pipe boots and vents
-
skylights
-
ridges and hips
-
eaves and gables
From our experience, a steel roof can have perfect panels and still leak if flashing is rushed.
If you want a neutral authority source on roofing best practices, the National Roofing Contractors Association is a solid reference.
Step 10: Cut Edges, Metal Shavings, and Cleanup (People Ignore This, Then Regret It)
When you cut steel panels, you create sharp edges and metal shavings.
If you leave metal shavings on the panel surface, they can cause:
-
rust staining
-
coating damage
-
ugly spots that look like “roof failure”
Specially here at JA Edwards of America, good crews clean as they go. They do not treat cleanup like an optional step.
Step 11: Sealants and Closure Strips (Use the Right Ones)
Sealant is not magic. It is a tool.
Bad sealant work includes:
-
using random sealant that breaks down in heat
-
smearing sealant everywhere (messy and ineffective)
-
sealing spots that should breathe or drain
Closure strips help block wind-driven rain, insects, and debris at certain panel ends. Installers must place them correctly, or they can trap water.
From our experience, “more sealant” is not the same as “better roof.”
Step 12: Ventilation and Heat Matter More Than People Think
Florida heat does not just make your home uncomfortable. It can also stress your roof system over time.
Good installation considers:
-
attic ventilation balance
-
insulation quality
-
proper intake and exhaust paths
-
heat reflection potential
Common Mistakes We See With Steel Roofing Installs in Florida
From our experience, these are the big ones:
1) Choosing the wrong system for the roof shape
Some roofs need standing seam details to manage water better, especially with complex valleys.
2) Rushing flashing
This is the #1 leak cause in many installs.
3) Bad fastener installation
Overdriven and underdriven screws create long-term leaks.
4) Skipping proper underlayment
Underlayment protects the home when storms get weird.
5) Ignoring thermal movement
Metal expands and contracts. The system must allow movement.
6) Leaving metal shavings
This creates stains and corrosion over time.
How to Know If a Steel Roofing Install Was Done Well
You can look for signs without being a roofer.
A good install usually shows:
-
straight seams and clean alignment
-
neat ridge caps and edges
-
clean flashing transitions (not messy sealant blobs)
-
fasteners that look consistent and straight
-
no obvious dents or scratched coating
-
clean worksite and cleanup
If you feel unsure, the safe move is a professional inspection: roof inspection.
Conclusion: Install Steel Roofing Works Best When the Details Are Right
Install steel roofing can be a smart long-term choice in Florida. However, the system only performs well when the installation is clean and correct.
From our experience, you do not need a “perfect roof.” You need:
-
correct underlayment
-
correct flashing
-
correct fasteners
-
correct layout
-
clean finishing work
If you are considering a steel roof, or if you want a second opinion on an existing metal roof, start with an inspection: roof inspection.