
Ceiling and Roof Repair After a Leak: Why the Order Matters
A brown ring on the ceiling after heavy rain is the last stop of a leak that started on the roof. Painting over it before the roof is fixed and the cavity is dry traps the water inside, and fixing the roof without opening the ceiling can leave wet insulation and mold behind.
Ceiling and roof repair should be handled as one job done in a set order. First the roof opening is found and made watertight, then the wet drywall and insulation are removed and the cavity is dried, and only after the moisture readings are normal does the ceiling get rebuilt, primed and painted. FEMA notes that mold can start growing on damp surfaces within 24 to 48 hours, so the drying step can't wait for the paint crew.
The stain usually shows up after a heavy rain. Sometimes it's a brown ring on the bedroom ceiling, sometimes the paint bubbles, a musty smell hangs around after a tropical storm, or water drips around a light fixture. By the time you see it, the water has already worked its way through the roof covering, the underlayment, the deck and the insulation before it reached the drywall.
That's why the order of the repair matters so much. A ceiling patch makes the room look finished while the roof keeps letting water in, and a tarp keeps new rain out while the wet insulation and drywall stay sealed up inside. The fix that holds stops the water at the source, documents the damage, dries out the cavity, and then finishes the roof and the ceiling in that order.
What a ceiling stain can and can't tell you
A stain doesn't point to the exact spot where the roof failed. Water can run along the decking, trusses, wiring or insulation before it shows up indoors, so the ring on the ceiling may sit several feet away from the opening that let the water in.
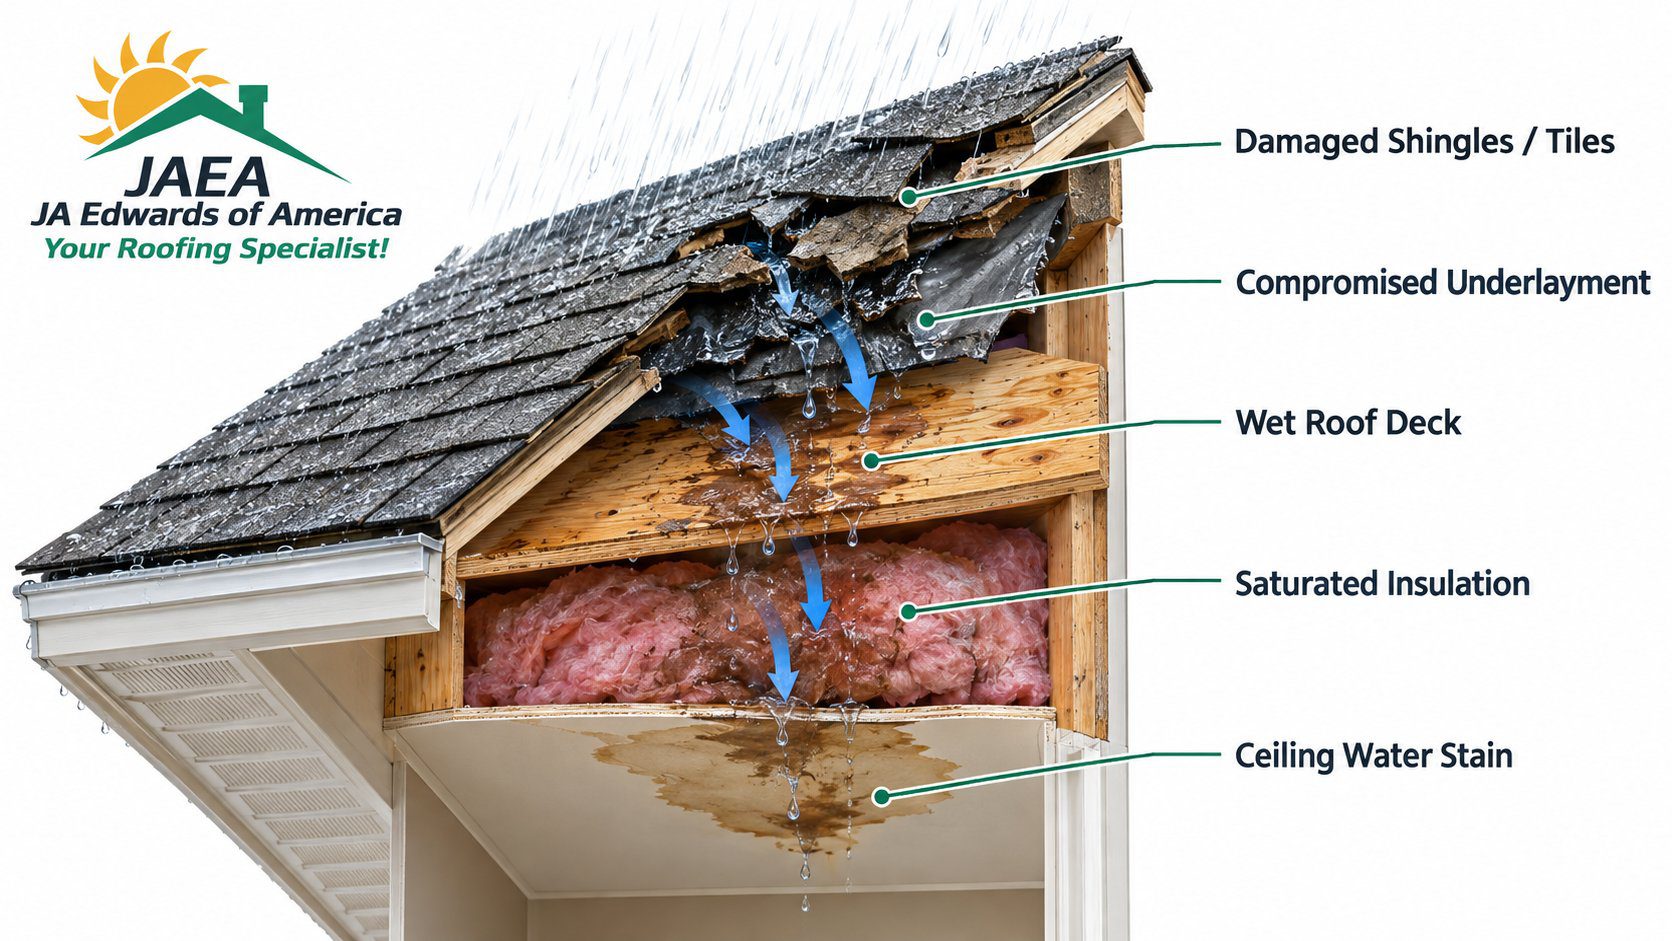
The path usually goes like this. Rain gets in through failed flashing, a lifted shingle, a cracked tile or a worn vent boot, reaches the underlayment or the deck, soaks into the insulation in the ceiling cavity, and dampens the framing and drywall until you finally see a stain, bubbling paint, sagging drywall or a drip. Painting over the ring only hides the last step of that chain, which is why the roof and the ceiling both have to be checked before anyone closes the ceiling back up.

The look of the stain gives you some clues. A fresh, sharp-edged stain after a single storm points to a recent roof failure, while a yellowed ring that keeps growing, or a musty smell, usually means the same spot has been getting wet over and over. Neither one tells you how far the damage goes or whether the roof needs a small repair or a bigger replacement.
Once the water is under control, cleanup is the next thing on most people's minds. A deep cleaning checklist like the one from Canes Cleaners helps you plan the general cleanup, but wiping down surfaces doesn't replace a moisture check, cutting out wet drywall or fixing the roof. For the outside warning signs to look for, see our guide to the top signs you have a roof leak. It was written for Jacksonville, but the same signs apply in Orlando, Tampa, Port St. Lucie, Pensacola and the rest of Florida.
How a roof leak reaches the ceiling
A Florida roof is a set of layers, not one waterproof sheet. The shingles, tile or metal on top shed most of the rain, the underlayment is a second drainage layer underneath, the deck holds everything up, and the flashing steers water around walls, valleys, chimneys and vents.
A leak can start at failed wall or chimney flashing, a lifted or missing shingle, a cracked tile, a worn pipe boot, dried-out sealant around a vent, or fasteners that backed out of a metal panel. Wind-driven rain can push under the overlaps of a tile roof, and hurricane winds can break the seal between shingle courses so the tabs lift with every gust after that.
A storm failure and a slow leak look different
A storm failure tends to show up all at once. The ceiling stains after one heavy rain, a tile shifts or a shingle edge lifts. A slow leak wets the same cavity again and again, leaves a smell that won't go away, softens the drywall, and keeps the insulation damp long after the ceiling looks dry.
A small mark on the ceiling doesn't mean the roof problem is small, and a stain doesn't automatically mean you need a new roof either. A good inspection compares the roof covering, flashing, decking, the moisture inside, the age and condition of the roof, and how much material was affected. Before the roofer arrives, note where the stain sits in relation to exterior walls, plumbing lines, vents, skylights and roof valleys. That helps the roofer narrow down the source faster, though it can't replace looking from the roof and the attic.
What to do in the first few days
Start with safety and with keeping the water under control, and leave the cosmetic work for later. If water is still coming in, put a container under the drip and move furniture, electronics and belongings out of the way. If the water is near a light fixture, ceiling fan, outlet or wiring, shut off that circuit only if you can reach the panel without touching anything wet.
The Florida Department of Financial Services tells homeowners to make emergency repairs that protect the house from further damage, and it gives placing a tarp on the roof as the example. It also says to photograph the damage before and after those repairs and keep the receipts (DFS: What to expect after filing a homeowners claim).
Your first-week checklist
- Stop more water from getting in. Contain the drip inside and have a professional put up an emergency tarp once the weather allows. The tarp keeps new rain out, but it isn't the repair.
- Protect the room. Move what you can, cover the rest with plastic, and keep everyone out from under drywall that's sagging.
- Photograph everything before cleanup. That means the ceiling, walls, floors, belongings, whatever roof damage you can see from the ground, and the tarp once it's on.
- Track whether the stain is growing. Trace its outer edge lightly in pencil and write the date next to it. Don't press on a ceiling that's swollen.
- Keep every record in one place. Tarp invoices, drying receipts, contractor notes, photos and every message with your insurance company.
- Book an inspection that covers both sides. Ask the roofer to find the source on the roof and to document the damage it caused inside.

Mold doesn't give you much time. FEMA's mold guidance says colonies can start growing on a damp surface within 24 to 48 hours and recommends removing wet porous materials such as ceiling tiles and drywall. For soaked wallboard, it says to cut it out to a foot above the water mark (FEMA: Dealing with mold and mildew). An air purifier like this EcoQuest mold air purifier can help with the air in the room once the source is handled, but it won't dry a ceiling cavity or close a hole in the roof, so the water and the wet materials come first.
Stay off a roof that's wet, steep, damaged or still getting wind. In 2024, 389 of the 1,034 deaths in private-sector construction came from falls, slips and trips, and 95.9% of those were falls to a lower level, according to the U.S. Bureau of Labor Statistics. Those were trained workers. Our checklist for the first 48 hours after hurricane roof damage covers the rest of the storm response, and getting on the roof belongs to a crew with fall protection.
When a repair becomes a replacement under Florida code
Florida's 25% rule can change the whole repair plan. Under the Florida Building Code, when more than 25% of a roof or roof section is repaired, replaced or recovered within 12 months, the whole roof or section generally has to be brought up to current code. Since 2022, section 553.844 of the Florida Statutes makes an exception for roofs built, repaired or replaced to the 2007 Florida Building Code or later, where only the part being repaired has to meet current code even past 25%.
The 12-month window is what catches people. Three small repairs spread over two years may never land in the same window, while several jobs done in one year can add up to a code problem. The exact math depends on the roof area, which section was affected, the scope of each job and how the local building department counts it. Fixing the ceiling doesn't reset any of that, because drywall work doesn't change how much roof was repaired, so keep the invoices, permits, photos, scopes and dates from earlier work.
| Scope | What usually happens | Permit | Code risk |
|---|---|---|---|
| Ceiling stain only | Dry the cavity, remove damaged material if needed, rebuild the ceiling after the roof is watertight | Depends on the interior scope and the city or county | Low for the ceiling, but the roof source still has to be found |
| Localized roof failure | Repair flashing, a vent or pipe boot, or replace selected shingles, tiles or metal parts | Depends on local rules | Grows as the repair covers more of the roof or section |
| Several repairs in one year | Add up the roof area repaired, replaced or recovered across all of them | Often needs review by the building department | Can cross the 25% threshold |
| Replacing a whole section | Tear off and rebuild the section with every required component | Generally required, with inspection | Current code applies |
The percentage isn't the only code question. When a site-built home is reroofed, Florida's code also brings in hurricane mitigation steps such as re-nailing the roof deck and adding a secondary water barrier, so the contractor has to check the deck and framing instead of laying a new covering over a structural problem. Our explanation of Florida's 25% roof replacement rule goes through the details and the 2007 exception, and the final requirements should come from the contractor and the local building department. Keep in mind that what the code requires and what insurance pays for are two separate decisions.
Stain on the ceiling after the last storm?
We'll trace it back to where the water is getting in on the roof, photograph what we find on both sides, and tell you whether it's a repair or a bigger job. Florida licensed CCC1334804, GAF Master Elite.
The restoration sequence, roof to ceiling
A proper restoration starts by stopping the water and documenting the conditions before anything gets torn out. The crew inspects the outside, photographs the damage, finds the entry point, and decides whether the roof can be repaired or the section needs more work.
On the roof, that can mean removing the damaged shingles, tiles or membrane, exposing the deck, replacing rotten decking, putting down new underlayment, rebuilding the flashing and reinstalling the covering to the manufacturer's specs. On a tile roof the real problem is often the underlayment or flashing hidden under the tile, and on a metal roof it's usually fasteners, seams, penetrations or a damaged panel. That's the roof repair part of the job, and nothing inside should be closed up until it's done.

Inside, the work follows the water path
Once the roof is watertight, the interior crew maps the moisture and opens up the wet areas. They pull out soaked drywall and insulation past the wet edge, check the framing and wiring, dry the cavity, and confirm with a moisture meter that it's dry before anything gets closed in. After that the finish work goes in this order:
- New insulation goes in only after the cavity is dry and the framing is sound.
- Damaged drywall is replaced and fastened properly, with the finishes around it protected.
- The joints are taped, mudded and sanded, and the texture is matched to the rest of the ceiling.
- The repaired area gets a stain-blocking primer, so the old ring doesn't bleed through the new paint.
- Paint goes on last and is blended into the surrounding ceiling.
On a job that goes past the roof, a Florida licensed roofing contractor handles the roof and a licensed general contractor handles bigger interior or structural work. Permits and final inspections depend on the work and on your city or county, so ask who is responsible for each one before anything starts.
A finished job should come with a clear explanation of what caused the leak, photos of the hidden conditions where possible, confirmation of how the wet materials were handled, and a written scope of what was repaired or replaced. If you're comparing damage restoration companies, ask how the roofer and the interior crew will coordinate, instead of taking two separate promises that never talk to each other.
Insurance deadlines and what to get in writing
A strong claim file connects what happened outside to what happened inside. Keep the likely date of the loss, the date you found it, the ceiling photos, the roof photos taken from a safe spot, any moisture or drying records, the tarp receipt, the inspection findings, the estimates and every message with your carrier together.
Florida law sets the timeline. New and reopened property claims have to be reported within 1 year of the date of loss and supplemental claims within 18 months, and for hurricane and windstorm claims that clock starts on the date of landfall or the date the windstorm caused the damage. Once the insurer gets notice of the claim, it generally has 60 days to pay it or deny it, according to the Florida homeowners insurance overview from the Department of Financial Services. Those deadlines aren't a reason to wait, because the stain keeps getting worse while the file sits and your policy may have its own notice requirements.
The Homeowner Claims Bill of Rights adds more checkpoints:
- The insurer has to acknowledge your claim within 7 days of when you submit it.
- If you send a complete Proof of Loss Statement and ask in writing, the insurer has 30 days to tell you whether the claim is covered, partly covered, denied or still under investigation.
- You're entitled to a copy of the adjuster's detailed damage estimate within 7 days after it's written.
- Within 60 days of submitting the claim you should get full payment, payment of the undisputed part, or a written denial, with some exceptions.
If the carrier disputes the roof source, the interior damage, the scope or the cause, ask for its explanation in writing. A roofer can document the conditions and explain the work, but the insurance company decides what's covered. Our guide on documenting storm damage for a Florida insurance claim shows how to organize your records before you meet the contractor or the adjuster.
A ceiling that keeps staining, a roof with repeated leaks, widespread wear, soft decking, patches that don't match, or a repair history that's getting close to the 25% line are the situations where a roof replacement conversation makes sense. That call should come from what the inspection documents, not from the roof's age alone or an assumption about what insurance will pay.
JA Edwards of America provides photo-documented roof inspections, leak diagnosis, emergency tarping, roof repair and replacement for homes and businesses across Florida, from our offices in Orlando, Tampa, Jacksonville, Port St. Lucie and Pensacola. If you have a stain on the ceiling and don't know where it's coming from, schedule a free roof inspection and we'll connect the damage inside to the source on the roof, with photos of both.
Ceiling and roof repair: frequently asked questions
Should I fix the roof or the ceiling first?
Can a water-stained ceiling be dried and repainted instead of replaced?
How do I keep a ceiling stain from coming back?
How can I tell if the repair was complete?
Does storm damage guarantee my insurance will pay for the ceiling and roof?
- FEMA: Dealing with mold and mildew in your flood damaged home
- Florida Statutes 553.844, windstorm loss mitigation and roof requirements
- Florida Department of Financial Services: Homeowners insurance overview
- Florida Homeowner Claims Bill of Rights
- DFS: What to expect after filing a homeowners claim
- U.S. Bureau of Labor Statistics: Fall hazards in construction
Find where the stain starts
Tell us where the property is and what you're seeing on the ceiling. The office nearest you calls back with a real inspection time.